A Complete Guide to Installing Composite Decking Corner Trim
When it comes to decking, the details matter. One small yet powerful feature that often gets overlooked is corner trim. You might think of it as just an aesthetic add-on, but it’s much more. Decking corner trim doesn’t just complete the look of your deck; it also protects vulnerable edges, preventing long-term damage.

Table of Contents
The Function of Decking Corner Trim
Decorative Role: Creating a Seamless and Polished Look
Corner trim bridges the gap between composite deck boards and surrounding structures. Without it, gaps and uneven edges stand out, giving your deck a rough, unfinished appearance. Installing corner trim refines the entire aesthetic, creating a smooth transition that enhances the design.
Protective Role: Guarding Against Impact, Wear, and Moisture
Beyond looks, corner trim acts as a shield. It absorbs minor impacts, protecting the edges of your deck boards from chips or cracks. Plus, it prevents moisture from seeping into exposed corners, reducing the risk of warping or decay—essential for keeping your deck looking pristine over the years.
Preparation Before Installation
Accurate Measurement and Cutting
Measure the edges of your deck.
For corners, cut at a 45° angle so the pieces meet seamlessly.
Tools and Materials Checklist
Saw for cutting
Measuring tape
Glue for adhesive installation
Nails or a nail gun
Hammer
Step-by-Step Installation Guide
1) Prepping the Surface: Ensuring Clean and Level Edges
Your deck surface must be spotless and even. Dirt, debris, or uneven spots can compromise the adhesive or cause gaps. Take the time to sand rough edges and wipe down surfaces for better adhesion and alignment.
2) Fixing Methods for a Secure Installation
Glue Fixing
Apply a high-strength adhesive evenly across the back of the trim. Press it firmly onto the deck’s edge and hold it in place until it sets. This method is clean and avoids visible fasteners.
Nail Fixing
Use fine nails or an air nail gun to secure the trim. Ensure even spacing, about every 50 cm, for a consistent and sturdy fit.
3) Treating Corners for a Seamless Appearance
Corners are tricky but essential for a professional look. Use a bevel cut to create a tight joint where two pieces meet. Test the fit before securing to avoid misalignment.
Key Considerations During Installation
Checking Ground Flatness to Avoid Gaps or Looseness
Uneven surfaces can cause gaps between the trim and the deck. Use a level to ensure the ground and deck edges are even. Address inconsistencies before installing.
Reserving Expansion Joints: Allowing for Seasonal Floor Adjustments
Decks expand and contract with temperature changes. Install the trim slightly above the deck boards to cover expansion gaps while allowing the deck to ”breathe” without causing warping or buckling.
MATECO Composite L Corner Trims

WPC Outdoor Trimming P87C
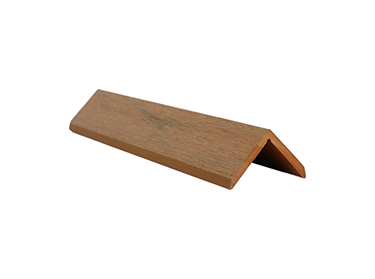
TThe WPC Exterior Trimming P87C is a 45x45 mm wood-plastic composite trim designed for outdoor use.
View MoreOur 45x45mm L-shaped corner line is designed to combine durability, functionality, and style. Crafted with precision, this corner line is perfect for seamlessly covering gaps while protecting your deck’s edges from wear, impact, and moisture.
If you are looking for a WPC manufacturer, MATECO will be your best choice.
WhatsApp: +86-13380085620
Email: info@matecowpc.com


